All parts needed can be purchased at Radio shack except for the di-electric grease. This can be purchase at most auto parts stores. (Napa)
1 Rocker switch
6 feet of wire. (the same gauge as what's used on the quad works best. I think it's 18 gauge)
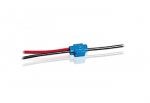
1 Wire Tap-In squeeze connector
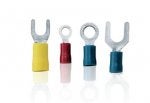
2 Female Crimp-on Quick Disconnects
1 Solderless insulated Spade tongue (big enough to fit around the battery bolt)
Some di-electric grease
For pics of the parts, goto the bottom of the post.
Step 1. Start by taking the seat, rack and plastic off so you can access the right side of the engine and the battery. (right side if you're sitting on it.)
Step 2. Locate the green with white stripe sensor cable going into the "bullet style" sensor on the top of the engine. You can pull it straight up to pop it off, in order to verify that it's the correct cable. (if powered on, the reverse light should come on.) Trace this wire back up to the wiring harness.
Step 3. Cut your 6' wire into 4' and 2' pieces. (**If you don't want a switch, don't cut the wire. Follow this next step except connect a spade tongue instead of the female quick-disconnect and run straight to the negative terminal of your battery.**) Choose a spot on the green w/ white strip wire and crimp the 4' piece to it using the Wire Tap-in. Coat w/ di-electric grease and wrap with electrical tape. Strip and crimp a Female Quick-Disconnect to the other end. (you can choose to wait to do this step until after you get the exact length needed to get to your switch so you can cut away the excess.)
Step 4. Next choose a high location (some where that will keep dry usually) to place the switch. I chose the plastic guard that goes over the handlebars. Drill a hole in this location big enough to fit the back of the Rocker switch. Insert the switch and attach the female quick-disconnect.
![Image]()
Step 5. Strip and crimp a Female Quick-Disconnect to the 2' wire and attach that to the switch as well. Cover with di-electric grease and wrap with electrical tape.
Step 6. Strip and crimp the spade tongue to the other end and run to the negative terminal of the battery. A light dab of di-eletric grease here wouldn't hurt as well.
The caviot to having this switch in place is that it needs to be turned on prior to the quad being turned on, or it won't be engaged. Also, if you turn the switch off while the quad is running, it will dis-engage the override until the key is turned off and back on. The benefit is that you can dis-engage it for less experienced riders.
1 Rocker Switch
[attachment=684:rocker_switch.jpg]
1 Wire Tap-In squeeze connector
[attachment=685:wire_tap_in.jpg]
2 Female Crimp-on Quick Disconnects
[attachment=686:female_c...connects.jpg]
1 Solderless insulated Spade tongue
[attachment=687:spade_tongue.jpg]
1 Rocker switch
6 feet of wire. (the same gauge as what's used on the quad works best. I think it's 18 gauge)
1 Wire Tap-In squeeze connector
2 Female Crimp-on Quick Disconnects
1 Solderless insulated Spade tongue (big enough to fit around the battery bolt)
Some di-electric grease
For pics of the parts, goto the bottom of the post.
Step 1. Start by taking the seat, rack and plastic off so you can access the right side of the engine and the battery. (right side if you're sitting on it.)
Step 2. Locate the green with white stripe sensor cable going into the "bullet style" sensor on the top of the engine. You can pull it straight up to pop it off, in order to verify that it's the correct cable. (if powered on, the reverse light should come on.) Trace this wire back up to the wiring harness.
Step 3. Cut your 6' wire into 4' and 2' pieces. (**If you don't want a switch, don't cut the wire. Follow this next step except connect a spade tongue instead of the female quick-disconnect and run straight to the negative terminal of your battery.**) Choose a spot on the green w/ white strip wire and crimp the 4' piece to it using the Wire Tap-in. Coat w/ di-electric grease and wrap with electrical tape. Strip and crimp a Female Quick-Disconnect to the other end. (you can choose to wait to do this step until after you get the exact length needed to get to your switch so you can cut away the excess.)
Step 4. Next choose a high location (some where that will keep dry usually) to place the switch. I chose the plastic guard that goes over the handlebars. Drill a hole in this location big enough to fit the back of the Rocker switch. Insert the switch and attach the female quick-disconnect.

Step 5. Strip and crimp a Female Quick-Disconnect to the 2' wire and attach that to the switch as well. Cover with di-electric grease and wrap with electrical tape.
Step 6. Strip and crimp the spade tongue to the other end and run to the negative terminal of the battery. A light dab of di-eletric grease here wouldn't hurt as well.
The caviot to having this switch in place is that it needs to be turned on prior to the quad being turned on, or it won't be engaged. Also, if you turn the switch off while the quad is running, it will dis-engage the override until the key is turned off and back on. The benefit is that you can dis-engage it for less experienced riders.
1 Rocker Switch
[attachment=684:rocker_switch.jpg]
1 Wire Tap-In squeeze connector
[attachment=685:wire_tap_in.jpg]
2 Female Crimp-on Quick Disconnects
[attachment=686:female_c...connects.jpg]
1 Solderless insulated Spade tongue
[attachment=687:spade_tongue.jpg]